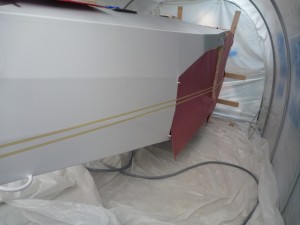
This afternoon I continued with preparations to the fuselage for the next coat. This kind of work is more time consuming and tedious than I had anticipated. Since I’m painting in parts, I have to make sure that all of the stripes are located very precisely. We decided to use a pattern as follows: starting from the blue top, next we have a 2″ white stripe. Then there is a 3/4″ blue stripe, then all white. This pattern is very similar to Peter Stevens’s N27PS, and is essentially the standard “Bob” stripes minus one. I started by establishing the 2″ stripe, since I can measure everything else from there. My goal was to make the stripe parallel to the split of the front windows, and to have the stripe arrive at the engine cowling right at the air inlet.
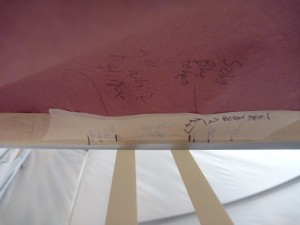
As you can see in the picture below, I did quite a bit of head scratching to figure that all out. I temporarily installed the front windows to mark the location of the split. I used a copy of the early Beartracks issue where Bob lists his measurements for the stripes he used, and also had a copy of the 2013 Bearhawk Calendar handy so that I could reference Zane’s picture of N27PS.
I decided to use a paint mask from Higher Graphics for the registration numbers. Our numbers are a simple block style, which we chose to compliment the vintage-like lines of the Bearhawk. I didn’t realize it until I read Russ Erb’s observation about it, but the aesthetic cues of the Bearhawk fuselage and tail remind me of older airplanes. Maybe that’s part of why it looks so appealing to me. I’m sure I could have made the numbers out of tape, but using this mask kept the numbers all consistent and parallel. I located them with consideration for the horizontal stabilizer and cargo door, but still ended up with some of the last “B” on the cargo door. For a while it will be TP instead of TB. I followed the directions that came with the mask, and it all went exactly according to plan. First I sprayed the area with a mist of water, then I taped the top of the carrier sheet in place with the backing still on. That held the numbers in the right spot.
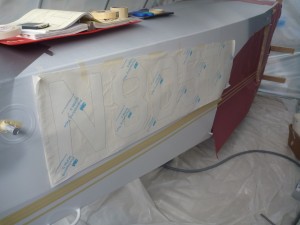
From there I was able to reach up from below and remove the backing, thus applying the adhesive of the letters and the carrier sheet onto the fuselage side. Once the letters were stuck, I just peeled off the carrier sheet and here is the result.
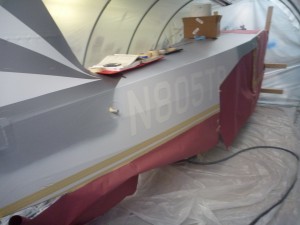

While this stage is tedious and quite consequential to the end result, it is also a phase with lots of visual progress.