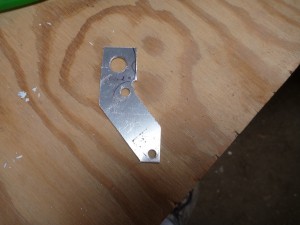
This morning I set the tension on the elevator turnbuckles to 30 pounds and safety wired the buckles with the double-wrap method. I made some aluminum strips that will attach to the perimeter of the hole in the back of the cabin, which will give me a better surface to attach velcro to for the fabric cover that will go there. I started making a bracket for the alternate air intake control, which I’ve decided not to install on the instrument panel. Instead, I’m going to install it under the panel by the left seat pilot’s left knee. I’ve been referring to the bracket as the California bracket, can you see why?
The left fuel tank was already out to provide access to the plumbing, so I cleaned and inspected it. I poured half of a gallon of fuel into the tank, sloshed it around, then drained it through the finger strainers. I removed those strainers to be sure that there wasn’t any gross accumulation of vegetables, animals, or minerals, and similarly checked the fuel in the clean bowl that I poured it into. I also removed the sight gauge fittings and aux pluming plugs, and applied a fresh thread sealant paste to all of the threads and reinstalled all of those fittings. I used a shop vac to clean out all of the little bits of debris and aluminum from the wing interior. I’m also going to replace the sight gauge tubing, in part because I’m not positive that it’s a fuelproof tube, and in part because it has been in there for several years now. It’s starting to yellow, and it seems silly not to change it out while I’m in here. These are the same sight gauges that Peter Stevens described in the Beartracks newsletter, and he specifies using Superthane ether-based tubing, which is available by order from Amazon and several other places. Many folks who use the machined fuel caps that Bob designed have had trouble getting them to fit in the filler neck. Mine were a very tight fit, so I took them down to John’s hangar at Lake Norman. I was in town for the EAA 309 build night, and to use John’s brake and lathe. I bent the latest version of the roof metal, along with several other pieces. He chucked up the fuel cap and turned the area where the o-rings mount down to 1.325 inches. John is a very helpful guy to know!
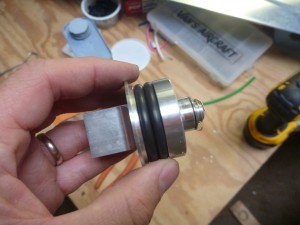
They fit much better now, though one of them is still pretty hard to get in. I’ll need to check to see if the filler neck is slightly out of round or undersized.